Pottery Class - Part 2

About two months ago, I left the safety of my orderly desk and ventured into a cermics studio for the first time, determined to learn the craft of turning clay into tableware. It's an art form that I have long admired, but the opportunity to learn how to do it never presented itself...that is, until I started working on Simon Leach's Pottery Handbook (a comprehensive guide for making wheel-thrown pottery, which we're editing now and planning to publish in Spring 2013). Now that I've completed my beginner's course, I can attest to the fact that a lot happens to clay on its way to becoming a pot: After its first spin around the wheel, the pot is deemed a "keeper" or a "do-over." If it's a keeper, then you set the pot under plastic for a few days or a week until it has firmed up and dried out a bit, at which point you put it back on the wheel and trim away excess clay, carving the bottom into a delightful shape. The pot is then bisque-fired in a kiln (which is sort of like prebaking a dough), and then it gets dipped in glaze and fired at super-high heat in a kiln, and this is where the glaze turns to glass, coating your creations in the most fascinating ways.

See how much I've learned?

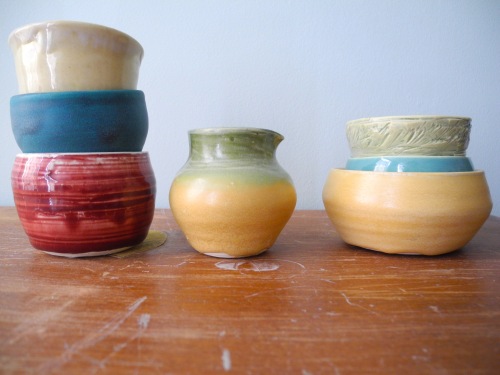
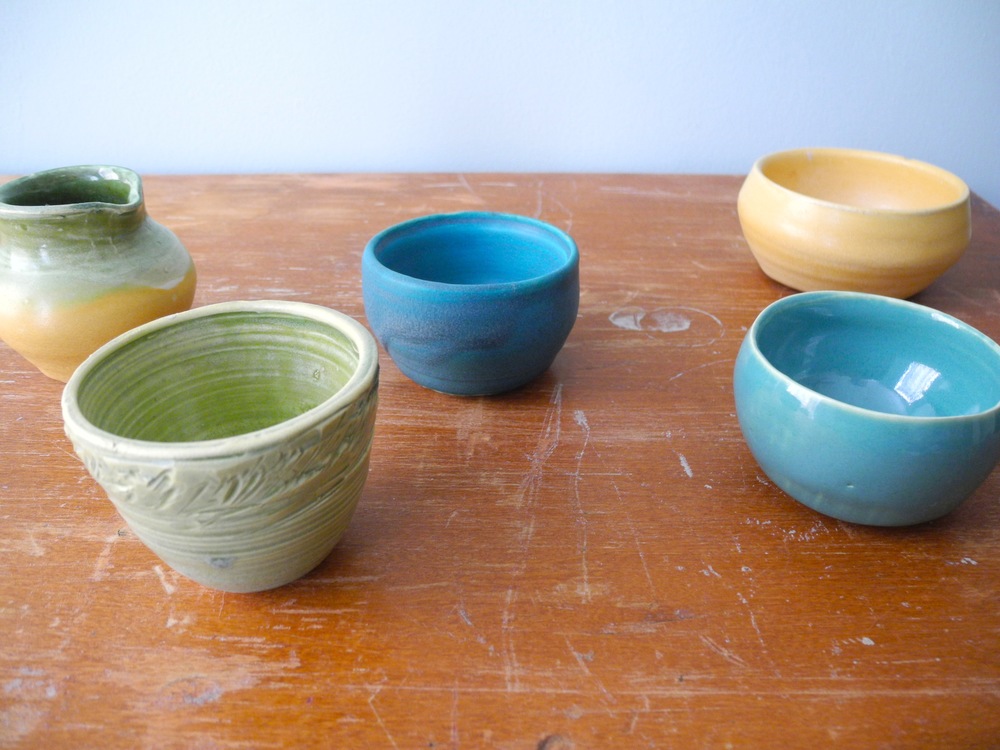
I must be honest--I didn't know how much I would love seeing the finished product. As you may recall from my first post, as a beginner I was happy just to see the wet clay become a somewhat symmetrical shape. But the first time I saw my clunky little freshly glazed pots, I breathed out a sigh of wonder. Oh, would you look at that glossy finish!, I thought, when I first saw the little blue bowl above. Or, when looking at the bowl below: How fascinating that the turquoise came out so matte, with so much gray and deep navy blue...

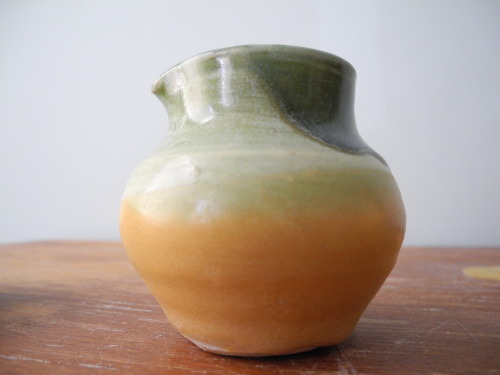
My proudest achievement (so far, anyway) has been the little creamer below. When I first threw this pot, I had in mind that it would be a little bud vase, but then I looked at its rim and thought, if I squeezed the clay just so, I could create a spout. (For the record, the act of creating that spout required a fair bit of courage since it was a nice bud vase as it was, and some things really are better left alone.) But now that it's glazed, I can't imagine it any other way.

Admittedly, I seem to have a fetish for finger bowls, and my favored palette appears to be distinctly Mediterranean. I supposed it's a good thing I love olives and roasted almonds, since it looks like I'll be serving a lot of these at my house! And yes, it's true that almost every one of my pots is wonky, but that doesn't bother me too much. In fact, I now look at the ceramics sections in stores and cannot believe that there are potters out there who can throw tableware so consistently. Someday, I think, if I keep practicing, I might be able to do the same. But for now, I'm thrilled that I have challenged myself to learn something new, and I have the good fortune of being taught by and working with some of the best potters in the world as we develop what will truly be an amazing pottery book. And finally, I hope that this post inspires you to try your hand at something new--until you try, you'll never know what exciting, wonderful, and wonky creations will spring forth from your own two hands. What is it that you have always wanted to learn? Please share in the comments section below!

My Diary of a Wimpy Kid Repurposed Tee


Two years ago, Amulet Books (part of Abrams Books, just like STC Craft is) released the fourth book in the Diary of a Wimpy Kid series--Dog Days. The Abrams marketing department went all out promoting the book, even organizing a cross-country ice cream truck tour. One day that summer, all Abrams employees walked into their offices to find a bright yellow Dog Days T-shirt on their desks. Just a little gift to get us excited about the book. And truly, I thought it was a very sweet gift. But deep down, I felt a little bit guilty because, well...I don't wear T-shirts. Pretty much ever. Let's just say that the boxy sleeves and straight waist of a standard tee don't do me any favors. So I took the shirt home and it sat in a drawer. I thought to myself, maybe I should hang onto the shirt and take it to Antiques Roadshow in 40 years when it will have become a true collector's item. But then, as summer 2011 rolled around, and I came up with an even better idea. Being a craft editor, I was, in fact, a little embarrassed that I hadn't thought of it earlier. I decided to cut up that boxy tee and turn it into a cute girly tank.

I first considered using the corset pattern from Alabama Stitch Book, but those tanks require cutting up an extra-large shirt and the Dog Days T-shirt was a trim ladies medium. Instead, I reached for a fabulous all-purpose T-shirt transformation book--Save This Shirt--which was, incidentally, the very first STC Craft book I ever helped edit.

I settled on the design for Fit to Be Thai-d, a tank with a high front (so I could preserve the Dog Days logo), and an ornate laced up back. One of the first steps is to spread out your T-shirt, place a tank top that fits you really well on top of it, then trace around the edges. Once you've transferred the shape of your tank, you pin along the shoulders and sides and stitch along the tracing lines on a sewing machine.


I realized about halfway into making the shirt that I wasn't going to have enough material on the sides (or the bottom for that matter) to do the fancy lace-up ties in the back. Yes, it's true, even craft book editors sometimes skim the instructions and make silly mistakes. But, never one to be discouraged, it was at that point that I strayed from the pattern and improvised! I trimmed away the excess material from the neck, shoulders, and sides, and tried on the tank to check the fit. The top looked nice, but I didn’t like the way it fit at the hips. I wanted it to flare out a bit more like a tunic. So I cut slits up the sides and then cut out two triangles of fabric from one of the sleeves. I sewed the triangles into the slits, and voila, instant flares. And now I have a lovely tank to wear during these last long dog days of summer...perfect for barbecues, picnics, water balloon fights, naps in hammocks, and of course, eating ice cream cones.


Designing Fabric with Heather Ross--Lucky Me


Last week I hit the jackpot when it comes to being a craft book editor. I learned how to design my own fabric with none other than Heather Ross. We were working together on her next book, Heather Ross Prints, which we will publish in Fall 2012. While Weekend Sewing, Heather's first book, was a tour de force full of gorgeous, doable sewing projects, her next book will focus on all manner of crafts that can be made using fabulous repeating designs, hers (see sampling below) and your own (just keep reading). 

One of the first chapters in Heather Ross Prints is dedicated to teaching crafters how to make their own repeating designs using artwork of their making and/or choosing. Up until last week, this section of the book was making Heather and I feel both nervous (“How exactly will we do this?”) and excited (“It will be so cool if we can do this!”). So, once Heather had written her first draft, I printed it out, wrote out a million notes and questions, and headed downtown to Heather’s apartment. After being treated to an amazing homemade lunch—Heather is 8½ months pregnant, and so, according to her, lunch is a “big deal”—we sat down at the computer and started reviewing the manuscript.

About five minutes into the process, I turned to Heather and said, “I really think it would be most effective if I tried to create my own repeating design following your instructions…you know, to see if it works.” And so she handed over a sketchpad and said, “Sure, what would you like to draw?”

As she warned in her manuscript, this would be the scariest moment of the design process. What should I draw? Can I draw? These questions were running through my head. But before I committed to just drawing a simple circle or star, I thought, I’d like to try to draw my favorite animal: a bear. With some artistic tips from Heather regarding the shape of the nose and the hulk of the belly, I suddenly had a bear (shown below alongside Heather's bafflingly cute donkey.)

Once the sketch was done, we scanned it into the computer and Heather taught me how to turn it into an illustration. It was my first time drawing with a stylus, and true to another warning in her manuscript, it was pretty awkward. While coloring in my bear, I could not stop laughing every time I got near the “outline,” knowing that mine would be super wobbly. But after some practice, I got the hang of it and could make fairly controlled strokes.

After about an hour or so of coloring in the background, playing with different hues, and shading some areas of the bear, we saved the file and uploaded it to Spoonflower—a site where you can print your own designs onto fabric of your choosing and buy it by the yard.

Next we played with the repeating design.

Seeing my silly little bear design up on the screen felt so empowering. It was unbelievable that in just an afternoon, I was able to use my humble artistic skills to create a fabric design that I will proudly use to make pajama bottoms for the whole family next Christmas. How cool is that?

Having gone through the process myself now, I feel confident that this is something anyone can do, and I personally can't wait to sit down and do more. But for now, I should probably get back to the editing.

Thanks again, Heather!


From The Repurposed Library: A New Sewing Box

If you’re reading this blog, you are most likely a person who A) loves crafts, and B) loves books. If you meet both of those criterion, then chances are you'll be interested in one of our newest STC Craft titles: The Repurposed Library.

When we first acquired this book nearly two years ago, e-readers were new on the scene. The Nook may not have existed yet, but we could see which way the wind was blowing. The Repurposed Library felt like the perfect response to a tech-savvy world that’s changing before our eyes. Both ironic and beautiful, The Repurposed Library presents craft projects to make, literally, out of old books, lifting obscure tomes off of dusty shelves, and putting them in a new light. 

I edited this book and worked closely with the author, Lisa Occhipinti, from beginning to end. When I finally decided to make a project from the book, I was drawn to so many things—from the decorative book bursts made from folded book pages to the shelves made from a sturdy stack of drilled hardcovers—but the sewing box seemed like an excellent choice for me since I love to sew and am constantly leaving my notions about. Shown above is the inside of my finished sewing box, and below is what it looks like when it's closed.

I must say, the hardest part of making this project was picking out the book. As a book lover, it is very hard to find a book you feel okay about putting under the knife. Especially with old books, there’s a certain amount of reverence—a sense that it has been passed through many hands, perhaps loved, perhaps not—and that you are now the keeper of this book in a vast "world library." So, I’m not going to lie: I bought four used books before I found the one I felt okay about transforming into a sewing box. Luckily, Lisa provides us with a very helpful section on selecting books—from how to identify first edition and rare books (which you should not cut up) to the importance of evaluating sentimental value—so when I found the book I wanted, I felt good about my choice.

I chose an old Reader’s Digest Condensed Book from the 1950s. The books in this series all have wonderful, decorative hardback covers hiding beneath their jackets, and almost no value whatsoever. As an added bonus, there are cute little illustrations throughout, which I’ve been cutting out and gluing onto homemade cards (shown below is a card I sent to my mom for Mother’s Day…)

The sewing box project couldn’t have been easier. To get started, you simply remove the pages from the book with two slices of an Xacto knife down the inside spine (the pages will all be glued or sewn together, so they come out in one big chunk). Then you measure your balsa wood, which you can find in sheets at craft or art supply stores, and trim it to size with an Xacto knife (the wood is very soft and easy to cut through). Then comes the fun part: You get out your hot glue gun and glue the compartments in place! I managed to complete all of these steps, beginning to end, in under two hours.

If you’d like to try your hand at making the sewing box, download the instructions here! And if you’d like to see more projects from the book, click here.

Stitch Magic Scarf


Stitch Magic: A Compendium of Techniques for Stitching Fabric Into Exciting New Forms and Fashions is one of the new books on STC Craft's spring list, and it's a wonderland of fabric manipulation--how to fold, twist, pleat, and pucker fabric, then stitch it down into the most mesmerizing creations. The first time I set eyes on the photos from Stitch Magic, I'll admit to being a bit intimidated, but once I started reading through the directions, I was shocked to discover that these techniques are actually quite simple to execute. Some may take a little time to create, but the looks you can acheive with these simple twists and turns are so incredible, the time spent is absolutely worth it.

 Stitch Magic is divided into nine sections by technique--cut shapes, folded shapes, pleating, pintucking, quilting, cording, hand-stitch marks, smocking, and special fabrics. Included in each section are directions for the technique, with lots of of ideas for varying it (all shown in photos), plus projects.

The technique that caught my eye first was cording, which is essentially done by laying a piece of cord on fabric, holding it in place, then stitching it down with a wide zigzag. You can swirl the cord to make a meandering trail, hold it down straight and narrow, or twist the cord every few inches to make a loop that hangs freely from the fabric (as shown on this pillowcase.) 

Last week I decided to use the cording technique to make a long scarf that I could wrap around my neck several times. Since I'm a knitter, too, I have a ton of stash yarn on hand. So I used some of my leftover yarn scraps for the cording, and I of course couldn't stop at just one color--I had to have blue, green, gold, light brown, and white.


One of my favorite features of the finished scarf is the white zigzag stitches on the reverse side (below). The cording beneath creates ridges on the back, and the white slanted stitches against the yellow provide glints of sheen and a bit of texture.

And here I am wearing the scarf  this weekend. While it may not be perfect springtime weather here in New York, I did manage to find some time yesterday to sit in the park and bare my arms in the sunshine. And with the scarf draped several times around my neck, I was nice and cozy, daydreaming of the leaves that will soon be on the trees.

As you can see, the fun of Stitch Magic is imagining what you can create with each technique. The book includes a number of projects to get your creative juices flowing, but it is also intended to inspire you to strike off on your own. You can add a little embellishment (along the hem of a skirt, perhaps?), or embark on a larger endeavor (wouldn't it be lovely to create an entire quilt top using this cording technique?) The choice, of course, is up to you!

To see a gallery of images from Stitch Magic, click here.

Liana's Valentine Treat Boxes


Last weekend I decided to make the Treat Boxes from Modern Paper Crafts: A 21st-Century Guide to Folding, Cutting, Scoring, Pleating, and Recycling by Margaret Van Sicklen. I bought some pretty "Valentine" papers from the stationery store down the street from our office and, with some trepidation because I thought it might be hard, I got started. After several basic folds, I only found myself stumped once--when I reached the step where the box pops up into its 3-D form. But after an "ah-ha" moment, the walls sprung into shape and the box bottom was done. Amazingly, the whole production only took about 5 minutes. After another 5 minutes, I had the box lid done, and then I quickly folded several more. Soon enough, I didn't even need to look at the instructions anymore! I was addicted. Boxes surrounded me. 

Modern Paper Crafts won't be on sale until April, but we'd love it if you would preorder. In the meantime, check out some sample pages here, and make some beautiful boxes of your own (click here for the instructions--our Valentine's Day gift to you).

One more thing: If you want to add a sweet Valentine treat, try the Soft Candy Caramels from another STC book, Baked Explorations. Melanie made a batch last fall and they're irresistible. Click here to download the recipe.